
Safety Warning
DIY auto repair can cause serious injury, fire, or vehicle damage. These guides are for informational purposes only. Always follow OEM torque specs, wear PPE, and consult a certified mechanic if you are unsure. You are solely responsible for your safety.
1987 Chevrolet R 10 P/U 2WD V8-454 7.4LFACTORY OEM SERVICE PROCEDURE
Charging the System
USING CHARGING STATION J-23500-01
Use instructions provided with charging station with the following exceptions:
1. Do not connect high pressure line to A/C system.
2. Always keep high pressure valve closed on charging station.
3. Perform all evacuation and charging through accumulator low-side pressure service fitting.
^ Use of these procedures will prevent charging station from being accidentally exposed to high-side vehicle system pressure.
USING DISPOSABLE CANS OR REFRIGERANT DRUM
WARNING: Never use these cans to charge into the high pressure side of the system (compressor discharge port) or into a system that is at high temperature, because the high system pressures could be transferred into the charging can causing it to explode.
^ If R-12 drum is used, place on scale and note total weight before charging. During charging, watch scale to determine amount of R-12 used.
^ If 14 ounce R-12 cans are used, close tapping valve, then attach cans following instructions included with manifold adaptor.
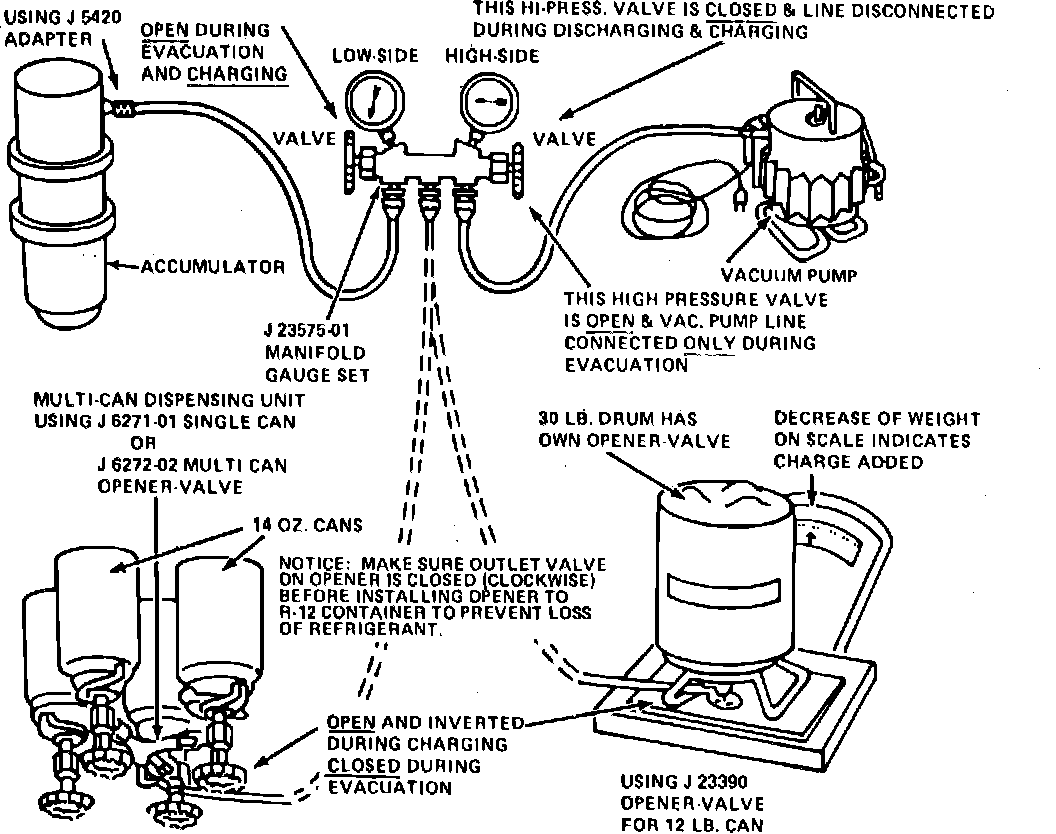
CHARGING OF SYSTEM
1. Start engine and allow to warm up, normal idle. Set A/C control lever to "OFF."
2. With R-12 drum or cans inverted, open R-12 supply valve and allow 1 lb. of liquid R-12 to flow into system through low-side service fitting on accumulator.
3. When 1 lb. of refrigerant has entered system, engage compressor by setting A/C lever to NORM and blower switch to HI to draw in remainder of charge. Cooling condenser with a large fan will speed up charging procedure by maintaining condenser temperature below charging cylinder temperature.
4. Close refrigerant supply valve and run engine for 30 seconds to clear lines and gauges.
5. With engine running, remove charging low side hose adapter from accumulator service fitting. Unscrew rapidly to avoid excessive refrigerant loss.
CAUTION: Do not remove a gauge line from its adapter when line is connected to A/C system. To disconnect line, always remove line adapter from service fitting. Do not remove charging hose at gauge set while attached to accumulator, as system will be discharged due to depressed Schrader valve.
6. Replace protective cap on accumulator fitting and turn engine "OFF."
7. Check system for leaks.
8. Start engine and check for proper system pressures.
Use instructions provided with charging station with the following exceptions:
1. Do not connect high pressure line to A/C system.
2. Always keep high pressure valve closed on charging station.
3. Perform all evacuation and charging through accumulator low-side pressure service fitting.
^ Use of these procedures will prevent charging station from being accidentally exposed to high-side vehicle system pressure.
USING DISPOSABLE CANS OR REFRIGERANT DRUM
WARNING: Never use these cans to charge into the high pressure side of the system (compressor discharge port) or into a system that is at high temperature, because the high system pressures could be transferred into the charging can causing it to explode.
^ If R-12 drum is used, place on scale and note total weight before charging. During charging, watch scale to determine amount of R-12 used.
^ If 14 ounce R-12 cans are used, close tapping valve, then attach cans following instructions included with manifold adaptor.
Charging C.C.O.T. A/C system:
CHARGING OF SYSTEM
1. Start engine and allow to warm up, normal idle. Set A/C control lever to "OFF."
2. With R-12 drum or cans inverted, open R-12 supply valve and allow 1 lb. of liquid R-12 to flow into system through low-side service fitting on accumulator.
3. When 1 lb. of refrigerant has entered system, engage compressor by setting A/C lever to NORM and blower switch to HI to draw in remainder of charge. Cooling condenser with a large fan will speed up charging procedure by maintaining condenser temperature below charging cylinder temperature.
4. Close refrigerant supply valve and run engine for 30 seconds to clear lines and gauges.
5. With engine running, remove charging low side hose adapter from accumulator service fitting. Unscrew rapidly to avoid excessive refrigerant loss.
CAUTION: Do not remove a gauge line from its adapter when line is connected to A/C system. To disconnect line, always remove line adapter from service fitting. Do not remove charging hose at gauge set while attached to accumulator, as system will be discharged due to depressed Schrader valve.
6. Replace protective cap on accumulator fitting and turn engine "OFF."
7. Check system for leaks.
8. Start engine and check for proper system pressures.
Factory Service Tools
Use the Manual With the Right Hardware
Pair factory procedures with proven DIY tools so the instructions are easier to execute.
Disclosure: Verified tool recommendations may earn an affiliate commission at no cost to you.
When to See a Mechanic
Stop DIY work and contact a certified mechanic immediately if any of the following apply:
- • You smell fuel, burning insulation, or see smoke.
- • Brakes feel soft, pull hard to one side, or make grinding noises.
- • The engine overheats, stalls repeatedly, or misfires under load.
- • You are missing required tools, torque specs, or safe lifting equipment.
- • You are not confident in the next step or safety outcome.
Rather have a pro handle this?
A certified mobile mechanic comes to your home or office. They bring the tools, you stay comfortable. No tow truck, no waiting room, no surprises.
Comes to youSame-day available12-month warranty
Get a Free QuoteNo obligation. See pricing before you book.