
Safety Warning
DIY auto repair can cause serious injury, fire, or vehicle damage. These guides are for informational purposes only. Always follow OEM torque specs, wear PPE, and consult a certified mechanic if you are unsure. You are solely responsible for your safety.
1985 Cadillac Seville V8-350 5.7L DSLFACTORY OEM SERVICE PROCEDURE
Installation
Installation
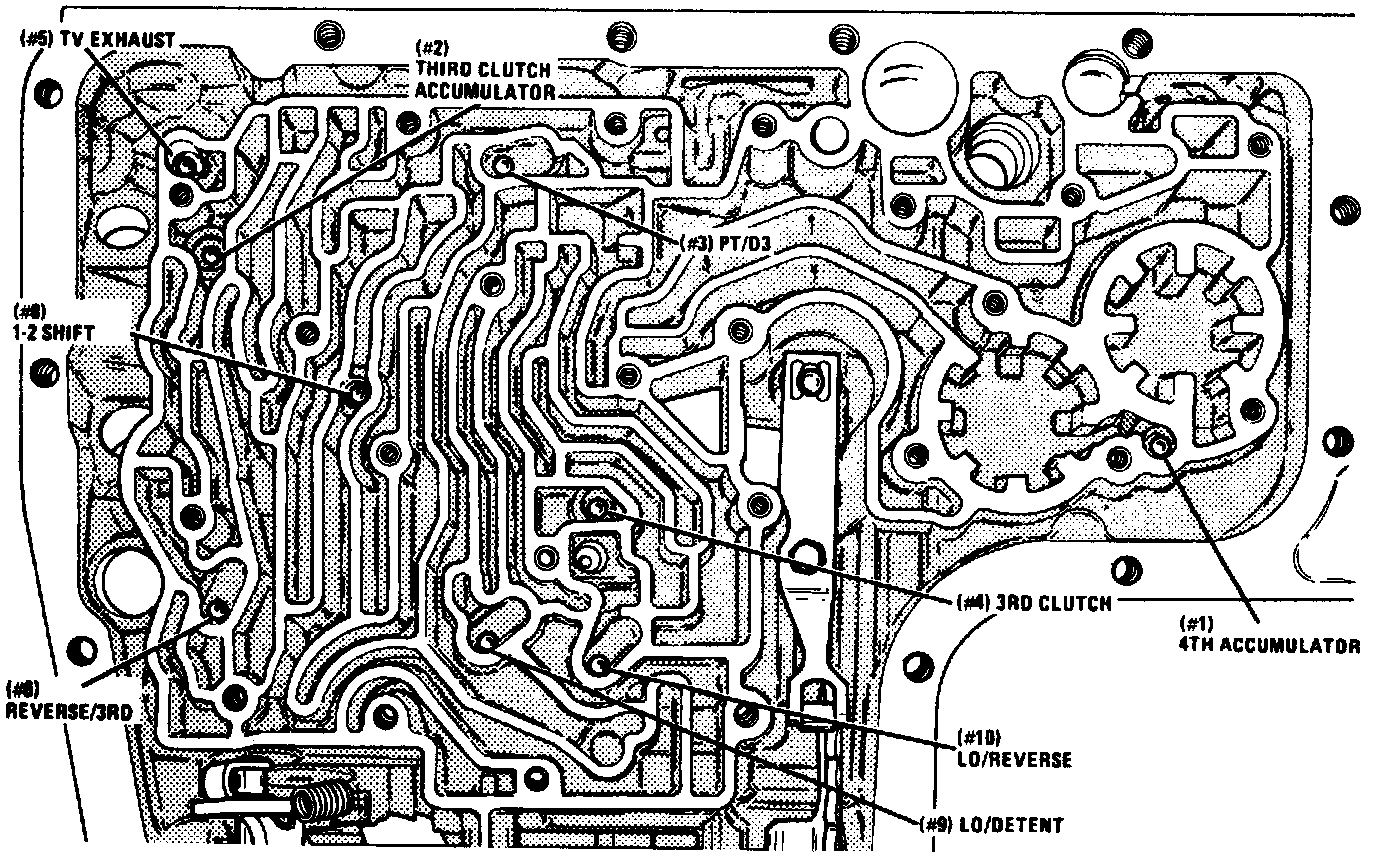
1. Install nine check balls in locations shown, see image, and retain with petroleum jelly.
2. Install two guide pins into case.
3. Inspect control valve assembly for nicks, gouges or porosity.
4. Position spacer plate to case gasket onto case, then place valve body spacer plate onto gasket marked
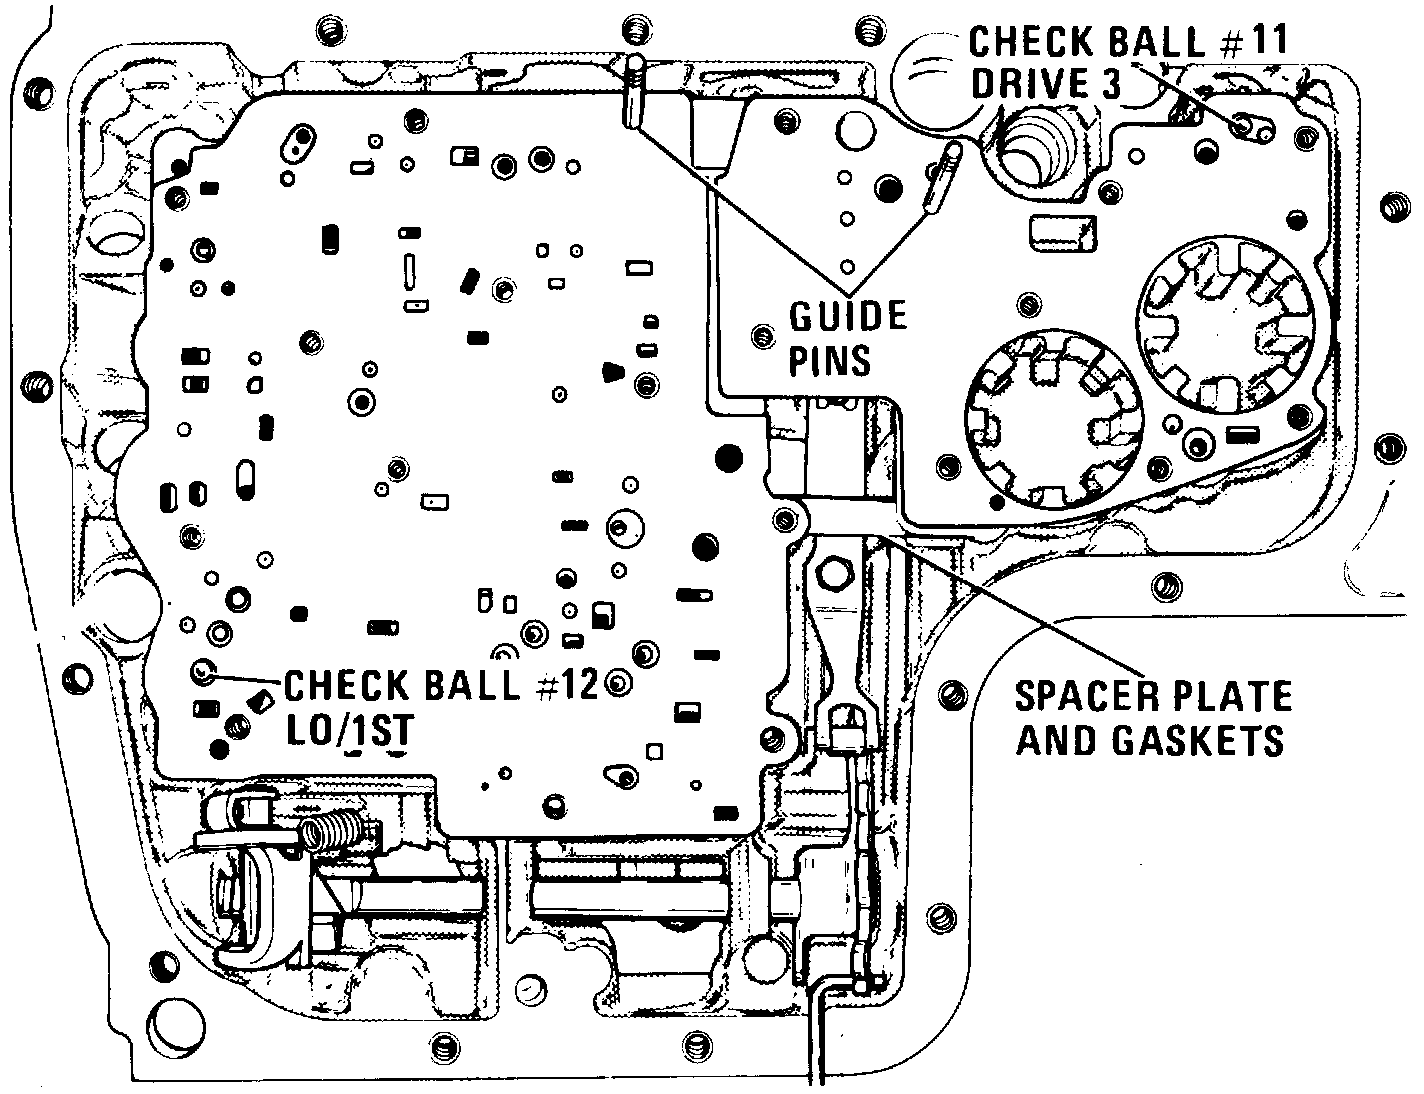
5. Place spacer plate to control valve assembly gasket marked "VB" onto valve body, then install check balls, see image, and retain with petroleum jelly.
6. Install control valve assembly, using two guide pins as locators, and start into case using two attaching bolts. Do not tighten bolts at this time.
7. Remove the two guide pins.
8. The 1-2, 3-4 accumulator assembly:
a. Remove the 1-2 accumulator pin snap ring, then the piston, spring and pin.
b. Remove the 3-4 accumulator upper snap ring, then the piston, spring, pin and lower snap ring.
c. Inspect the 1-2 accumulator bore, spring, piston, pin and snap ring for damage.
d. Install new 1-2 accumulator piston seal, if required, then place piston pin into housing.
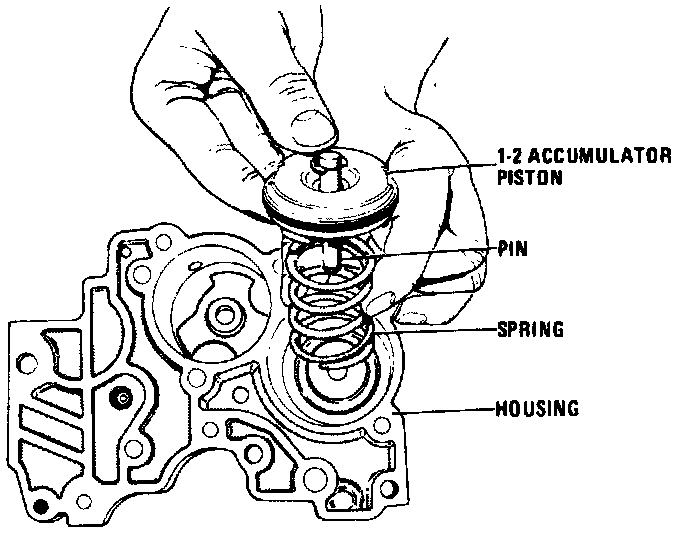
e. Install 1-2 accumulator piston into 1-2 accumulator bore, see image.
f. Inspect the 3-4 accumulator bore, spring, piston, pin and snap rings for damage.
g. Install new 3-4 accumulator piston seal, if required.
h. Install the 3-4 accumulator piston pin into housing and retain with snap ring.
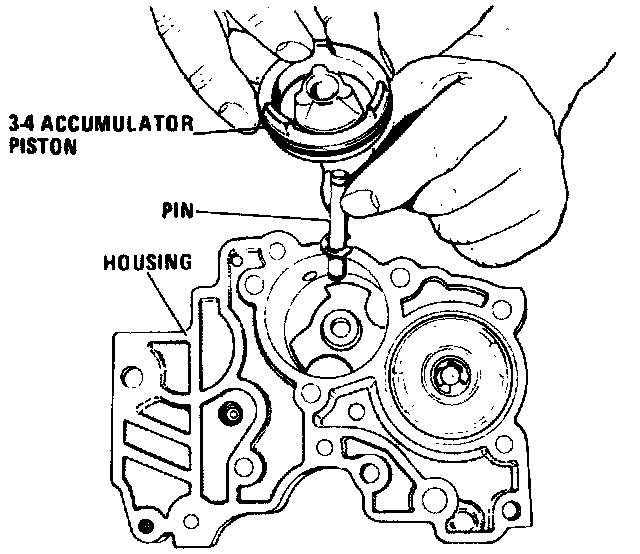
i. Install the 3-4 accumulator spring and piston into housing. Retain piston with snap ring, see image.
j. Inspect the fourth clutch pressure switch connector and threads for damage. Replace, if necessary.
k. Install the 1-2 accumulator spring into housing and the two guide pins into case.
l. Install the 1-2,3-4 accumulator assembly gasket and housing. The 1- 2 accumulator spring must seat into the 1-2 accumulator piston for proper installation.
m. Remove guide pins, install retaining bolts and torque to specifications.
9. To install the throttle lever and bracket assembly.
a. Inspect throttle lever and bracket assembly for damage.
b. If removed, install spring on top of lifter, then lifter spring first into throttle bracket.
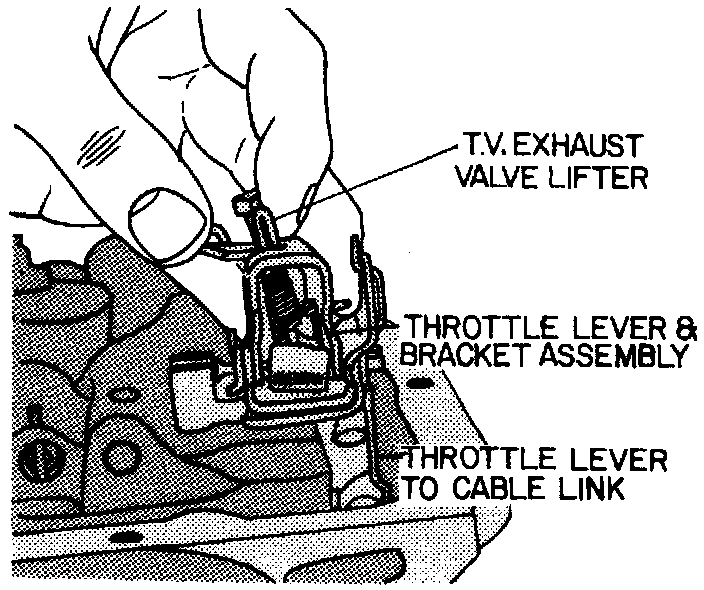
c. Install link on throttle lever making sure link is hooked as shown, see image.
d. Install throttle lever and bracket assembly, locating the slot in bracket with roll pin and aligning lifter through valve body hole and link through T.V. linkage case bore. Retain with bolt.
10. To install oil pipes:
a. Install solenoid screen in converter clutch signal pipe hole.
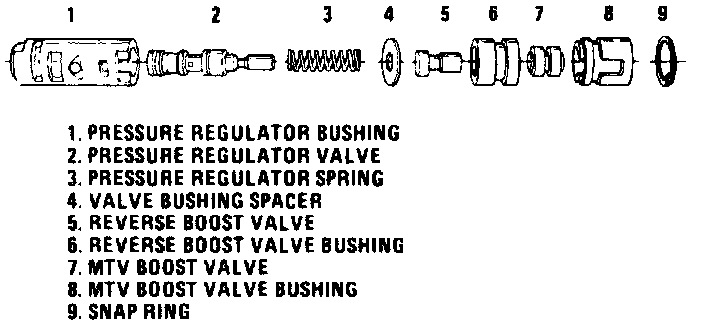
b. Install converter clutch signal, overrun clutch, reverse signal and D2 signal pipes into control valve assembly, see image.
c. Install the D2 signal, reverse signal and overrun clutch pipe retainers.
11. Install 4th clutch pressure switch into accumulator housing, if equipped.
12. Place new O-ring seal onto converter clutch solenoid, lubricate with petroleum jelly, and install solenoid into bore of 1-2, 3-4 accumulator housing. Install the two retaining bolts.
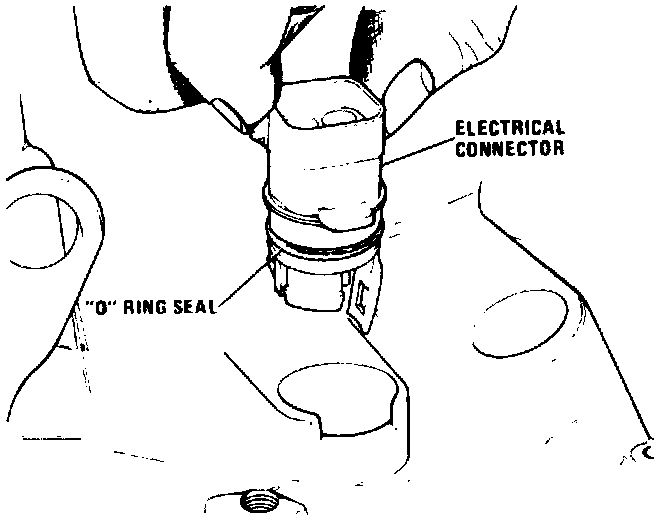
13. Lubricate new electrical connector 0-ring seal with petroleum jelly, place onto connector and install connector into case, see image.
14. Connect electrical connector wires to 4th clutch and 4-3 pressure switches, if equipped.
15. Install remaining control valve assembly retaining bolts and torque to specifications.
1. Install nine check balls in locations shown, see image, and retain with petroleum jelly.
2. Install two guide pins into case.
3. Inspect control valve assembly for nicks, gouges or porosity.
4. Position spacer plate to case gasket onto case, then place valve body spacer plate onto gasket marked
5. Place spacer plate to control valve assembly gasket marked "VB" onto valve body, then install check balls, see image, and retain with petroleum jelly.
6. Install control valve assembly, using two guide pins as locators, and start into case using two attaching bolts. Do not tighten bolts at this time.
7. Remove the two guide pins.
8. The 1-2, 3-4 accumulator assembly:
a. Remove the 1-2 accumulator pin snap ring, then the piston, spring and pin.
b. Remove the 3-4 accumulator upper snap ring, then the piston, spring, pin and lower snap ring.
c. Inspect the 1-2 accumulator bore, spring, piston, pin and snap ring for damage.
d. Install new 1-2 accumulator piston seal, if required, then place piston pin into housing.
e. Install 1-2 accumulator piston into 1-2 accumulator bore, see image.
f. Inspect the 3-4 accumulator bore, spring, piston, pin and snap rings for damage.
g. Install new 3-4 accumulator piston seal, if required.
h. Install the 3-4 accumulator piston pin into housing and retain with snap ring.
i. Install the 3-4 accumulator spring and piston into housing. Retain piston with snap ring, see image.
j. Inspect the fourth clutch pressure switch connector and threads for damage. Replace, if necessary.
k. Install the 1-2 accumulator spring into housing and the two guide pins into case.
l. Install the 1-2,3-4 accumulator assembly gasket and housing. The 1- 2 accumulator spring must seat into the 1-2 accumulator piston for proper installation.
m. Remove guide pins, install retaining bolts and torque to specifications.
9. To install the throttle lever and bracket assembly.
a. Inspect throttle lever and bracket assembly for damage.
b. If removed, install spring on top of lifter, then lifter spring first into throttle bracket.
c. Install link on throttle lever making sure link is hooked as shown, see image.
d. Install throttle lever and bracket assembly, locating the slot in bracket with roll pin and aligning lifter through valve body hole and link through T.V. linkage case bore. Retain with bolt.
10. To install oil pipes:
a. Install solenoid screen in converter clutch signal pipe hole.
b. Install converter clutch signal, overrun clutch, reverse signal and D2 signal pipes into control valve assembly, see image.
c. Install the D2 signal, reverse signal and overrun clutch pipe retainers.
11. Install 4th clutch pressure switch into accumulator housing, if equipped.
12. Place new O-ring seal onto converter clutch solenoid, lubricate with petroleum jelly, and install solenoid into bore of 1-2, 3-4 accumulator housing. Install the two retaining bolts.
13. Lubricate new electrical connector 0-ring seal with petroleum jelly, place onto connector and install connector into case, see image.
14. Connect electrical connector wires to 4th clutch and 4-3 pressure switches, if equipped.
15. Install remaining control valve assembly retaining bolts and torque to specifications.
Factory Service Tools
Use the Manual With the Right Hardware
Pair factory procedures with proven DIY tools so the instructions are easier to execute.
Disclosure: Verified tool recommendations may earn an affiliate commission at no cost to you.
When to See a Mechanic
Stop DIY work and contact a certified mechanic immediately if any of the following apply:
- • You smell fuel, burning insulation, or see smoke.
- • Brakes feel soft, pull hard to one side, or make grinding noises.
- • The engine overheats, stalls repeatedly, or misfires under load.
- • You are missing required tools, torque specs, or safe lifting equipment.
- • You are not confident in the next step or safety outcome.
Rather have a pro handle this?
A certified mobile mechanic comes to your home or office. They bring the tools, you stay comfortable. No tow truck, no waiting room, no surprises.
Comes to youSame-day available12-month warranty
Get a Free QuoteNo obligation. See pricing before you book.